


How to Use Lists
Categories
-
General Information
-
List Manager Overview
-
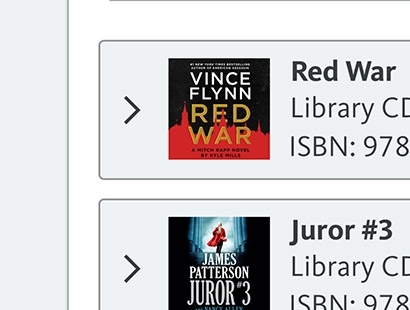
The List Manager is your gateway to view, create, share, and organize your selections. Lists are a fast, intuitive way to manage your selections, collaborate with team members, and organize your acquisitions. Users can create as many lists as they want!
To get started:
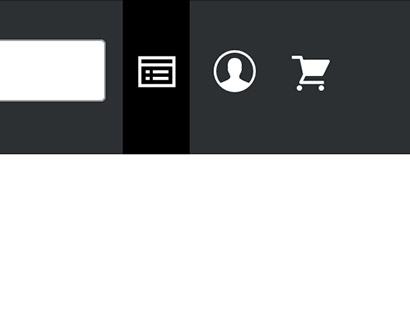
- Navigate to List Manager using the icon in the upper
righthand corner next
to the search bar.
- Navigate to List Manager using the icon in the upper
righthand corner next
to the search bar.
-
-
Types of Lists
-
- My Lists – Your personal creations.
- Shared Lists – Lists that have been shared with you by others at your library.
- Priority Titles – Pre-populated lists of highly ranked new and upcoming releases.
- Curated Collections – Pre-populated lists of special-interest categories, such as New York Times bestsellers.
Important note: pre-populated lists are subject to change. Priority Titles and Curated Collections lists are updated regularly.
-
-
Interacting with Lists
-
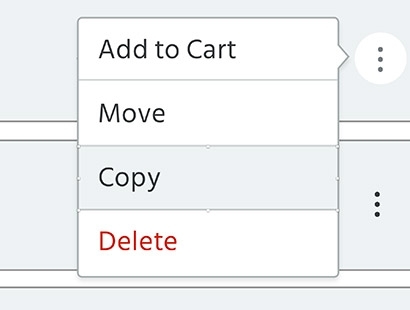
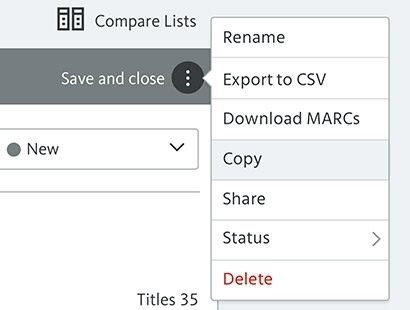
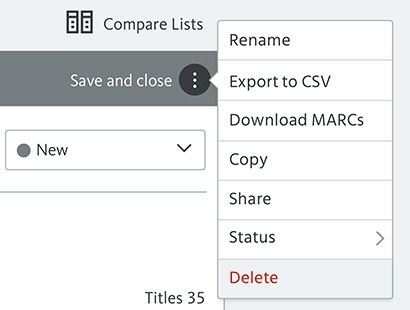
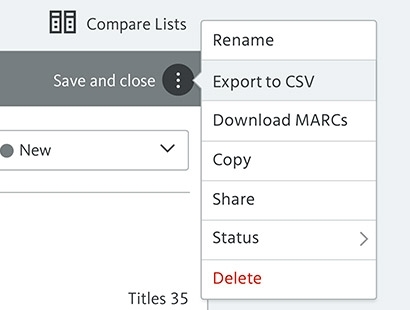
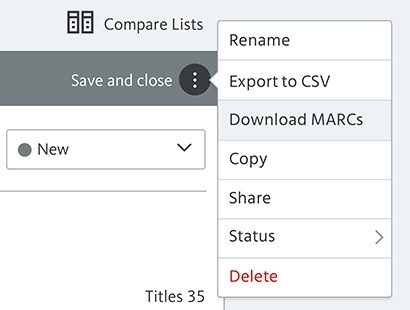
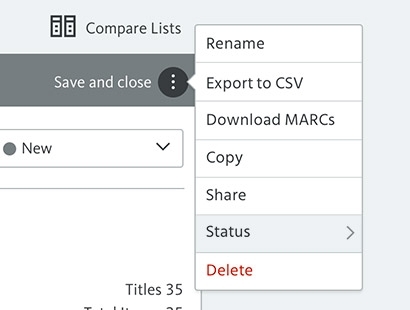
You can interact more with your lists from the Additional Options menu to the right of the list name
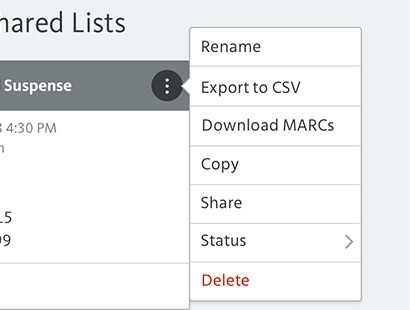
- Rename – Change the name of your list.
- Export to CSV – Download product information in spreadsheet form.
- Download MARCs – Download MARC records for all items in the list.
- Copy – Create a copy of the entire list. This can especially helpful when working with Priority Titles and Curated Collections lists, which are Read Only.
- Share – Share your list with others in your organization. Users will receive an email notification when you share a list.
- Status – Set a status to help manage your list workflow. Options include: New, Awaiting Approval, Approved, or Complete.
- Delete – Remove the entire list.
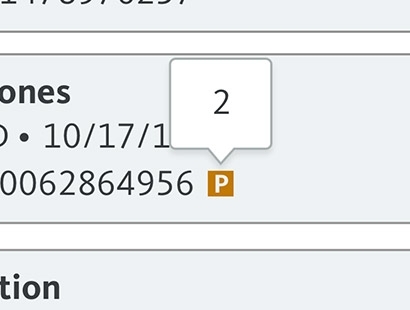
- [P symbol image] – This P symbol indicates your
organization has previously purchased this product. Hover over the symbol to
see how many copies have been purchased.
-
-
List Manager Overview
-
Using Lists
-
Create a New List
-
-
Create a New List from Homepage or Search
Results
- Hover mouse cursor over an item cover image anywhere on the website. Click the i icon that appears in lower left corner of the cover image pop up does not automatically appear.
- Select your product format.
- Click Add to List.
- Choose Create a New List and add a name.
Optional: Add product to an existing list available in the drop-down menu. - Click Add to List.
-
Create a New List in List Manager
- In List Manager, under My Lists, click Add New List.
- Name or rename your list by clicking the title bar.
- Use the main search bar or quick search option to find and products to add to your list.
- Add list-level notes in the large comment box.
- For list items, click the arrow next to cover image to expand for
more information to add item-level notes.
- Click Share icon to share with other users. You must
specify permissions to control how others can interact with lists
you share.

- Update the list status from the drop-down menu as needed:
New, Awaiting Approval, Approved, Completed - Changes to your lists are saved automatically. You may choose to manually save by clicking Save and Close.
- Basic details are displayed for each item. Click the title to expand for additional details and to open item-level notes. Click the cover image in expanded view to visit the full product details page.
- You can sort items in your list by Title, Release Date, Author or Publisher. Or you can drag and drop items to put them in a custom order.
-
Create a New List from Homepage or Search
Results
-
-
Add Product to List
There are multiple ways to find and add products to a list.
-
Add Products from Homepage
- Hover mouse cursor over any title cover image.
- Select product format.
- Click Add to List.
- Add product to an existing list available in the drop-down menu. Or create and name a new list.
- Click Add to List.
-
Add Products from Another List
- In List Manager, open any existing List.
- Choose an item to copy.
- Open the Additional Options menu for that item.
- Click Copy.
- Select which List to copy the item to.
- Click Duplicate.
-
To Copy All Contents of a List
-
- Click Copy in the Additional
Options menu.
- You will be automatically redirected to your new saved list.
- In List Manager, your new copy will appear under My Lists.
- Optional: Rename of your copy by clicking the current name in the title bar.
Important note: Copied versions do not update to match changes to the original.
- Click Copy in the Additional
Options menu.
-
-
Add Product(s) by ISBN
-
- From the List Manager page, create new or open an existing list.
- Click Copy/Paste ISBNS.
- Copy and paste one or more ISBNs into the text box. If adding more than one ISBN, separate by commas or enter one per line.
- OR select CSV of ISBNS. Attach a spreadsheet including a
single column of applicable ISBNs in your file.
Note: This step will add one copy to list per ISBN. - OR specify number of copies on import by selecting CSV of ISBNS W/ QTY. You must include a second column listing quantity per ISBN in the spreadsheet.
Important note: Do not include column headers in imported spreadsheets.
-
-
Add Products from Homepage
-
Delete Product from List
- Open the Additional Options menu for the product to be deleted.

- Select Delete.
- Changes to your list are saved automatically.
- Open the Additional Options menu for the product to be deleted.
-
Save List
Changes are saved automatically. You may choose to manually save by clicking Save and Close.
-
Delete List
Lists will remain in My Lists or Shared Lists until you choose to delete them.
-
To delete a list:
- Open the Additional Options menu
- Select Delete.
- Open the Additional Options menu
-
Sort List
- In an open list, click the Sort option you wish to use (located
below Notes field).
- Title – Sort alphabetically by Title.
- Release – Sort by on-sale or “street” date.
- Publisher – Sort alphabetically by publisher. Publisher name is visible in Expanded view.
- Author – Sort alphabetically by author. Author name is visible in Expanded view.
- Before or after sorting overall list, drag and drop items to make manual changes to list order.
- Click Sort option again re-sort entire list. This will undo any manual changes.
- Changes to your list are saved automatically.
- In an open list, click the Sort option you wish to use (located
below Notes field).
-
Copy List
-
- Click Copy in the Additional Options menu.

- You will be automatically redirected to your new saved list.
- In List Manager, your new copy will appear under My Lists.
- Optional: rename of your copy by clicking the current name in the title bar.
Important note: contents of pre-populated lists are subject to change. Copied versions of pre-populated lists will not update to match the original.
- Click Copy in the Additional Options menu.
-
-
Compare Lists
-
- Open a list you want to compare.
- Click Compare Lists (righthand side of screen above List title bar).
- Select a list to compare.
- Drag and drop titles from one list to the other
Note: You may add or delete items in any list with where you have Editor, Admin or Owner permissions. You can copy items from a list where you have Read Only permissions, but you are not allowed to add items to a Read Only list.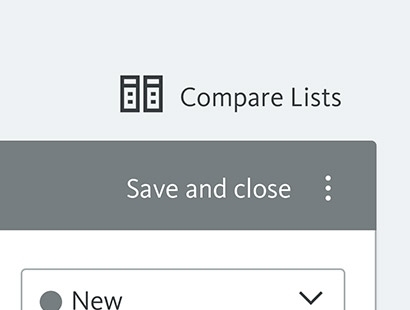
- To exit comparison view, click Save and Close on the list(s) you wish to close.
-
-
Export List as Spreadsheet
-
Option 1: Export List as Spreadsheet
- Click Export to CSV in the Additional
Options menu.
- A spreadsheet will download to your computer.
Option 2: Download Cart as Spreadsheet
- Add products to Cart (from List or one-by-one).
- In Cart, click Export Cart to CSV in the upper righthand side.
- A spreadsheet will download to your computer.
- Click Export to CSV in the Additional
Options menu.
-
-
Add List-Level Notes
-
Option 1: Add Notes in List
- Open or create a new List.
- Click text box to enter Notes field and proceed to type.
Important: Notes entered in Lists will apply to the entire order and are visible to all shared users. Notes are finalized at checkout. Notes will appear in Cart, in Order History, and on invoices.
Option 2: Add Notes in Cart
- Add products to Cart (from a list or one-by-one).
- Add or change contents of text box located above items in Cart as needed.
- Click Update Changes in sidebar next to Continue Shopping.
- Click Checkout and follow steps to complete your
order.
Notes are finalized at checkout. Notes will appear in Cart, in Order History, and on invoices.
-
-
Add Product-Level Notes
-
Option 1: Add Notes in Lists
- Open a List.
- Choose an item in list and click the item to open expanded view.

- Click in the Notes field and enter text.
- Changes are saved automatically.
- Note: you also have the option to add or edit order or item-level notes on the My Cart page.
Important: Notes entered in Lists will apply to the entire order and are visible to all shared users. Notes are finalized at checkout. Notes will appear in Cart, in Order History, and on invoices.
Option 2: Add Notes in Cart
- Add products to Cart (from a list or one-by-one).
- Add or change notes to items as needed.
- Click Update Changes in sidebar next to Continue Shopping.
- Click Checkout and follow steps to complete your
order.
Notes are finalized at checkout. Notes will appear in Cart, in Order History, and on invoices.
-
-
Place an Order from List
-
- Click Buy Now to add the entire contents of the List contents to your shopping cart.
- If items already exist in your shopping cart, you will be prompted to Merge
or Replace contents of cart.
Merge: Combine products in list with products already in cart.
Replace: Remove products already in cart. Only products from this current list will remain in the cart. - Modify your final order as needed. You can add more products to cart, adjust
add-ons, change quantities, or add notes.
Note: Your organization’s add-ons will be automatically applied. - Review your order.
- Click Update Changes if cart has been modified.
- Click Checkout and follow steps to complete your order.
-
-
Create a New List
-
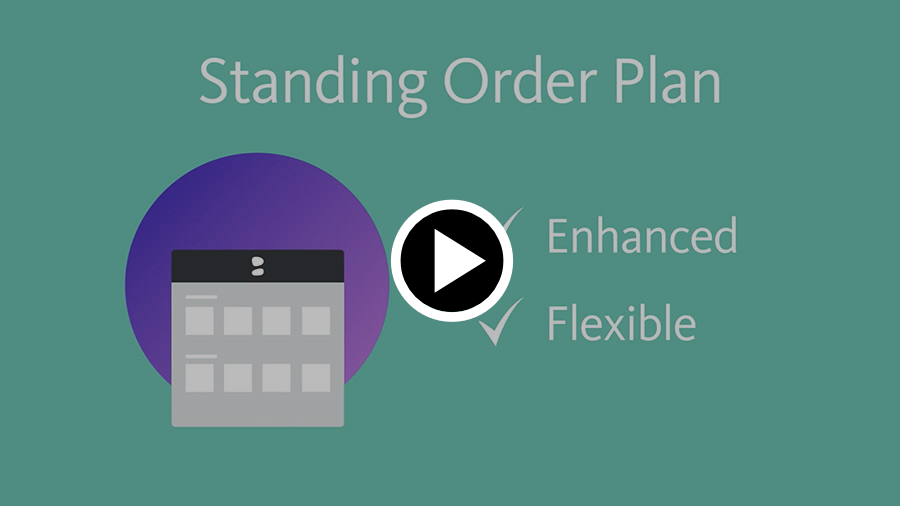
Standing Order Plans
-
Where is the SOP Module?
-
The SOP Module has been replaced with List Manager. Lists are a fast, intuitive way to manage your SOP selections, collaborate with team members, and organize your acquisitions.
-
-
View SOP Commitments
- Click SOP Snapshot in List Manager above My Lists
- OR click SOP Snapshot in your Account menu (icon in upper righthand corner next to Cart).
- View full details of your SOP commitments in Account Details under Standing Order Plans.
-
Where is the SOP Module?
-
MARC Records
-
Download MARCs from List
-
- Open the Additional Options menu
- Select Download MARCs.
- A .zip file will download containing Brief MARC records for all of the products currently in your list.
Important note: on your computer, you must extract contents from the .zip file to access the .mrc MARC file.
- Open the Additional Options menu
-
-
Download MARCs from List
-
Share and Collaborate
-
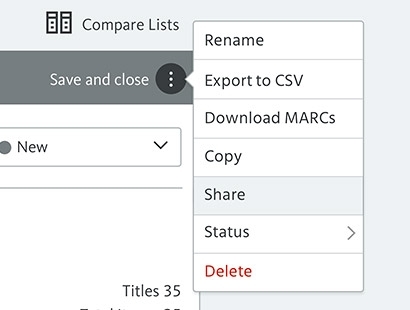
Share a List
- Open a list and click the Share icon below List name.
- OR open the Additional Options menu and select
Share.
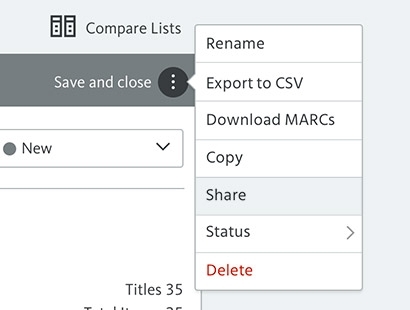
- In the drop-down menu, select the email address of member of your organization
- Choose permission level.
Owner: Top-level privileges. Can edit, share, add or update notes, change status, and delete the list for all users.
Admin: Can edit and share.
Editor: Can edit, add or update notes, and change status.
Read Only: View only. Cannot make changes to the shared List. - Click Share.
- An email notification of the new list will be sent to shared users.
- All users and permission levels are visible in the user panel (located below list name).
-
Edit Shared List
- Users with Owner, Admin, or Editor permissions can make changes to shared lists. All changes are saved automatically.
-
Change List Status
-
Sharing is a convenient way to submit a list of titles for approval or purchase.
- In a List, open the Status drop-down menu (located below Save and Close).
- OR hover over Status in the Additional
Options menu.
- Choose status.
New, Awaiting Approval, Approved, or Complete. - Status changes will appear color-coded for all shared users for easy management.
-
-
Use Notes in Shared Lists
- You can communicate with shared users by entering notes at the list- or
item-level.
Notes are finalized at checkout. These will appear in order history and on invoices.
- You can communicate with shared users by entering notes at the list- or
item-level.
-
Share List within a Consortium
-
If you are a member of a consortium, you can share with other individual accounts within your consortium. Follow steps to share as you would with users within your branch..
- Open a list and click the Share icon below List name.
- OR click Share in the Additional
Options menu.
- In the drop-down menu, select the email address of member of your organization
- Choose permission level.
Owner: Top-level privileges for this list. Can alter contents, share with others, change List status, and delete the list for all users.
Editor: Can make changes to contents, add or update notes, or change List status.
Read Only: View only. Cannot make changes to the shared List. - Click Share
- An email notification of the new list will be sent to shared users.
- All users and permission levels are visible in the user panel (located below list name).
-
List Manager makes it easy to share and collaborate with other users in your library
-
Share a List
-
Tips and Tricks
-
Use Pre-Populated Lists
- You can quickly use Priority Lists or Curated Collections to create your own unique selections.
-
Copy a Pre-Populated List
-
- Click Copy in the Additional Options menu.
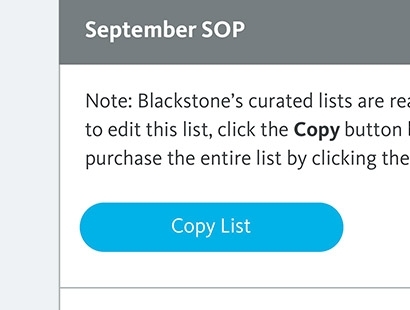
- You will be automatically redirected to your new saved list.
- In List Manager, your new copy will appear under My Lists.
- Optional: Rename of your copy by clicking the title bar.
- Click Copy in the Additional Options menu.
-
-
Add Products Using Compare Lists
- Create a new List.
- Click Compare Lists (located above Save and Close).
- Select a List to compare, such as monthly Priority Titles or NYT Bestsellers.
- Drag and drop items from the read-only list into your personal list as desired.
- To exit comparison view, click Save and Close on the list(s) you wish to close.
-
Search Products within List Manager
-
This quick search tool allows you to add products to list without leaving the List
Manager interface. Use this tool la carte style—it is most functional if you already
aware what titles you intend to add to your list.
- Open or create a list.
- Click Search (directly above the list name).
- Enter an ISBN, book title, author, or narrator name.
- Click the arrow expand for more info, if desired.
- Click Add or drag-and-drop item into List.
- Changes to lists are saved automatically.
-
This quick search tool allows you to add products to list without leaving the List
Manager interface. Use this tool la carte style—it is most functional if you already
aware what titles you intend to add to your list.
-
Save Notes to List from Cart
-
- Add products to Cart (from a list or one-by-one).
- Add or change notes as needed.
- Click Update Changes in sidebar (next to Continue Shopping).
To save changes made in Cart to List:
- Before checkout, click Save Cart to List (located in upper right below search bar).
- Create a new list or select a list to update.
- Click Add to List.
- Click Replace to update notes or quantities associated with products already in that list.
- OR click Merge to duplicate contents. This will increase product quantities in your list.
- Updates will appear in List Manager.
-
-
Share and Delete a List
-
After sharing a list with colleagues, you can delete yourself as an Owner.
- Open a list and click the Share icon below List name.
- OR click Share in the Additional
Options menu.
- In the drop-down menu, select a member of your organization to assign as new Owner.
- Add permission level: Owner.
- Optional: share with other users. You may grant users Owner, Admin, Editor, or Read Only permission levels. Be sure to include at least one additional Owner if you plan to delete your account from a list your created.
- An email notification of the new list will be sent to shared users.
- In the Additional Options menu for the list you just shared, select Delete.
- A Pop-up warning will trigger. Click Remove Me from List to remove your account from the shared list.
- All products, quantities, and notes are saved until changed by another user.
-
-
Change View to Different Library
-
If you are associated with multiple libraries, you may need to change which organization you are associated with in order to view Order History or share Lists with certain users.
To change your current organization:
- In List Manager, select the correct library from the Organization drop-down menu (located above My Lists.
- OR click the name of your current organization in your Account menu (located in the upper righthand corner next to cart).
- Once the webpage has refreshed, List Manager and Account Details will reflect information for your updated Organization preference.
- Your current organization’s name is always visible in the Account menu for easy reference.
-
-
Use Pre-Populated Lists